Showing posts with label tutorial. Show all posts

Thursday, June 28, 2007

thumb as fulcrum

Well, I have to admit this is a pretty good introduction to string bending from (and I can’t quite believe I’m citing this) Berkleemusic.

Only (very minor) point I would make is that it isn’t really your wrist that’s doing the bending, but your arm while using the thumb over the neck as a fulcrum.
(Via A Guitar Teacher’s Lesson Notebook.)

Sunday, April 22, 2007

training (the) quartet pt 2: network topologies

Before we delve into (re)engineering the protocol, let’s have a look at some simple combinations and topologies. We’ve already been introduced to the clockwise arrangement, so it’s a relatively trivial matter to come up with variants.alternative network topologies(Incidentally, there are 6 possible ‘closed-loop’ networks in which all members of the quartet are sharing affinity with one other and none are orphaned.)
Now, recalling the subgroup formations of a quartet…(re)grouping a quartet…we can now begin to implement these.implementing subgroupsIn your experiments, you are likely to come across further possibilities; take each possibility and see where it leads you. (A simple variant is to individually select your source of affinity without sharing this information with the group.)

some (unanswered) questions:

Same question as last time: can interaction ever be so simple?
No… but why not?

Do we ever use these schemes in ‘real-world’ performance?
Yes… no… well, maybe. My guess is probably not, but why the exercises? How might they be useful? What might they be articulating?

Are the results of these exercises ‘musical’?
Possibly not, or at least not without a lot of work. Given that these schemes do not lead effortlessly to musical ends, and given that we’ll probably never use these schemes on stage, why might this training be of use?
And never mind if the results ever approach ‘music’, does it ever make sense—are they culturally decipherable?

How do we start?
…?

Tuesday, April 17, 2007

great fools’ minds differ alike, seldom think

There must’ve been something in the air. Check out the following:

Or…Almost like I’ve discovered my doppelgänger from a parallel plane… ;-)

Sunday, April 15, 2007

playing in position pt. 10a: spanning a third

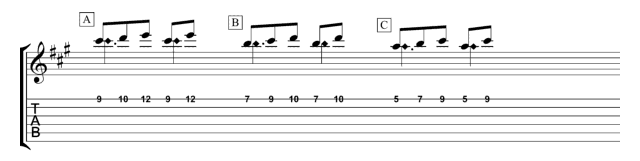
Remember these?descending major scale patternthree corresponding hand shapesWe first encountered these in ‘playing in position parts 7a’ and ‘7b’. It was in the latter article that I said that “the three patterns that we marked A, B and C (and the corresponding hand shapes) recur. There’s nothing particularly magical about this, it’s simply a side effect of how a major mode is constructed…”. Well, there isn’t anything magical about the patterns and shapes, but they do not come about purely by chance. As we cross the fingerboard, we’ll be encountering more and more of these recurring patterns, so to understand them, let’s have another look at the fingerboard hand.

Question: what is the distance between the first and fourth fingers?
Answer: three or four frets.

In other words, the fingerboard hand spans either a minor third (= 3 frets = 3 semitones) or a major third (= 4 frets = 4 semitones). Imprint this in your mind-body: the distance between the first and fourth finger is, in the case of the ‘finger-per-fret’ shape, a minor third or, in the case of the ‘extended’ shape, major third.
Keep this in mind, and many recurring patterns you’ll encounter on the fingerboard will make better sense. We’ll continue this in part 10b.

Thursday, March 22, 2007

training (the) quartet pt. 1.1: protocol of affinity

revision notes:

It’s not everyday that I post up a revised version of a post, but having sat on this a while, I think it’s worth it in the long run. The previous version of this article was titled ‘protocol of mirroring’ and I’ve pretty much simply substituted the word ‘mirroring’ with the phrases ‘sharing affinity with’ or ‘creating affinity with’.
Looking back on my old scribbles and notes on these exercises, I noticed that I used ‘affinity’ to describe the main protocol, and that’s the word that I use to describe this in practice (in rehearsals and in class), so I don’t know what stroke of anti-genius (what is the antonym of ‘genius’ in this context?) made me choose ‘mirror’ instead. Whatever the case, having re-read Haraway’s ‘Cyborg Manifesto’ recently, I was struck by the following:
Cyborg unities are monstrous and illegitimate; in our present political circumstances, we could hardly hope for more potent myths for resistance and recoupling. I like to imagine LAG, the Livermore Action Group, as a kind of cyborg society, dedicated to realistically converting the laboratories that most fiercely embody and spew out the tools of technological apocalypse, and committed to building a political form that actually manages to hold together witches, engineers, elders, perverts, Christians, mothers, and Leninists long enough to disarm the state. Fission Impossible is the name of the affinity group in my town. (Affinity related not by blood but by choice, the appeal of one chemical nuclear group for another, avidity.)
Donna J. Haraway (1991), ‘A Cyborg Manifesto: Science, Technology, and Socialist-Feminism in the Late Twentieth Century’ in Simians, Cyborgs, and Women: The Reinvention of Nature (New York: Routledge), pp. 154–155.
Not political alliances because we are the same, not alliances because we are related, not an alliance based on some intrinsic quality, but alliances borne out of contingency and necessity, because we can work towards some collectively desirable outcome. (I am reminded of the recent anti-war demonstrations which I’ve tangentially blogged about.)

revision 1.1:

Having specified the quartet formation, let me introduce the protocol in the context of this ensemble: affinity. Well, I’ll be calling this thing ‘affinity’, but when one is sharing affinity, or creating affinity, with another, it can, for example, mean any of the following:
imitating
impersonating
mirroring
creating similitude
corresponding with
correlating with
This is the elemental behavior within these exercises. When one improviser shares, or creates, affinity with another, the improviser modifies their behavior to correlate in some way to the behavior of the other. Affinity may be implemented as imitation or impersonation, behavioral or stylistic equivalence, etc. Don't get too dogmatic about this, improvisers will find various (creative) ways to implement this idea.
A simple arrangement of the quartet is in a circle in which each improviser creates affinity from the behavior of the improviser on one side (behavioral information is passed in the opposite direction).message-passing in a quartetThis sounds simple, and it is, but we’ll be developing and twisting this idea as the training continues.

some (unanswered) questions:

Does the concept of affinity hold up to scrutiny?
Given that improvisative interaction may encompass juxtapositions, contrasts and contradictions, how can we engineer, or justify, such simple interaction? Affinity is somewhat an arbitrary protocol, but I find it easier that others to explain and implement. I’m, however, very interested in hearing of alternatives.

Is the dualism embedded in this protocol (similar OR different) culturally restrictive?
Yes, it is, and this will come to haunt any ensemble, particularly those composed of inexperienced improvisers. Does anyone have any solutions?

Can interaction, under any circumstance, really be thought of as unidirectional?
Of course not….

Tuesday, March 06, 2007

playing in position pt. 9: fingerboard geometry

To simplify things, there’s basically three ways to change the pitch on a chordophone like a guitar: change the tension of the string, change the mass of the string, or change the effective vibrating length of the string. On the guitar the tension of the string is altered by ‘bending’ the strings or via mechanical means (e.g. tuning machines, a mechanical ‘detuner’ or whammy bar). In the context of position playing, however, it’s the latter two (mass and length of the vibrating string) that we’re interested in.The fingerboard as cartesian spaceYou can view the fingerboard as a two dimensional space in which pitch is dependent on the position both longitudinally and transversally in relation to the strings. Pitch is altered by moving up and down the string (changing the vibrating length of the string) or by moving perpendicular to the string, across the fingerboard (selecting strings of different mass and, to some extent, tension).
In our exploration of playing in position, thus far, we’ve really only concentrated on the first of these dimensions, but we’re about to extend playing in position across the fingerboard. (Or, recalling my earlier metaphor of the guitar fingerboard as “a set of single-pole, multi-throw switches”, having concentrated our efforts on the individual switches, we are about to practice moving between the switches.)

One of the interesting side effects this 2-dimesional arrangement is that the same pitch may appear at multiple coordinates on the fingerboard:E4 at six positions on the fingerboardAnother is that shapes derived from the comfortable hand shape (the diagonal fretting pattern that, from first to fourth finger, moves bass to treble across the strings, and bass to treble up the frets) tend to maximize the pitch interval available, while the reversed diagonal shape tends to minimize them. (These factors will become significant in, for example, the playing of clusters.)diagonal and reverse diagonal shapesKeep these ideas in mind as you approach the 2-dimensional fingerboard: you’re about to take a step towards what some players describe as the fingerboard ‘lighting up’….

Monday, February 12, 2007

training (the) quartet pt. 1: protocol of mirroring

Having specified the quartet formation, let me introduce the protocol in the context of this ensemble: mirroring. Well, I’ll be calling this thing ‘mirroring’, but when one is mirroring another, it can, for example, mean any of the following:

imitating
impersonating
sharing affinity with
creating similitude
corresponding with
correlating with
This is the elemental behavior within these exercises. When one improviser mirrors another, the improviser modifies their behavior to correlate in some way to the behavior of the other. Mirroring may be implemented as imitation or impersonation, behavioral or stylistic equivalence, etc. Don't get too dogmatic about this, improvisers will find various (creative) ways to implement this idea.
A simple arrangement of the quartet is in a circle in which each improviser mirrors the behavior of the improviser on one side (behavioral information is passed in the opposite direction).message-passing in a quartetThis sounds simple, and it is, but we’ll be developing and twisting this idea as the training continues.

some (unanswered) questions:

Does the concept of mirroring hold up to scrutiny?
Given that improvisative interaction may encompass juxtapositions, contrasts and contradictions, how can we engineer, or justify, such simple affinity? Mirroring is somewhat an arbitrary protocol, but I find it easier that others to explain and implement. I’m, however, very interested in hearing of alternatives.

Is the dualism embedded in this protocol (similar OR different) culturally restrictive?
Yes, it is, and this will come to haunt any ensemble, particularly those composed of inexperienced improvisers. Does anyone have any solutions?

Can interaction, under any circumstance, really be thought of as unidirectional?
Of course not….

Sunday, February 04, 2007

playing in position pt. 8b: one string melodies (yet again)

In part 8a, we looked at playing our melody with variable hand shapes in a diatonic context. Despite the variable shapes—‘finger-per-fret’ or ‘extended’—depending on the underlying intervals, those exercises were not much different in principle from our previous work.
Now, for this part 8b, let’s try something different. Same melody (from Morricone’s Cinema Paradiso), same idea (shifting position for each tone), but in this case, we’ll be sounding the fret under the middle fingers (i.e. fingers 2 or 3).melody played with second or third fingerAs in previous examples, I’ve indicated, in each case, the position of the first finger with the (lower) diamond notehead. However, in this case, I’ve additionally indicated the notional position of the fourth finger with the (upper) diamond notehead. By ‘notional position’ I mean that, were all the fingers of a given position be placed on the strings, this would be the position of the fourth finger. Simply put, by notating the positions of the first and fourth fingers, I am notating whether the ‘finger-per-fret’ or ‘extended’ shape is applicable to a given situation.
You may get this one straight away, you may not—this is certainly one of the trickier exercises we’ll be covering—either way, take your time and make sure that you continue to keep in mind that in position playing the guitar player gets their bearing from their first finger. However, in this case, not only should you be thinking of the position of the first finger, you should also keep in mind the (notional) position of the fourth finger.
If you’re having difficulty with this, try variants like the following:ornamented with a 4-1-2 or 4-1-3 fingering sequenceA little like the second example in ‘playing in position pt. 5: one string melodies (again)’, the above should aurally remind you of the positions of the first and fourth fingers in relation to the melody tone.

Tuesday, January 23, 2007

training (the) quartet pt. 0: why four?

I say ‘training,’ but what follows will hover somewhere between exercises, tutorials and a kind of improv meet and greet. These are not autonomous ‘compositions’ or ‘works’: they were never designed for public performance. They are teaching tools and also a way to train/rehearse an improvisative ensemble together in a relatively short space of time. Relatively novice improvisers can spend upwards of ten weeks on these; experienced improvisers can run through these in a couple of afternoons. Either way, after a group has run through the exercises, the strategies and tactics presented will affect an ensemble's collective behavior in improvised performances—some of it good, much of it problematic (but more of that later).
Although I am, and will be, more-or-less responsible for the (bloggified) written account, I can’t claim any kind of exclusive authorship of these exercises. What I will be presenting was developed with PH, AMC, DW, KN, SCL, EK, WW, SR and others, and I’ve borrowed some additional tactics from work with POD and PR. (Apologies for the code names, but, with some luck, the individuals involved will recognize themselves.)representation of a quartetWhy quartets? Why not duos? Trios? Quintets? Sextets? Dectets? Why not improvising orchestras? The short answer is a variant of the Goldilock’s response: It ain’t too big, and it ain’t too small.(re)grouping a quartetAdditionally, the quartet is the smallest unit in which you start getting interesting sub groupings. Trios too easily break down into solo-plus-accompaniment (1+2); duos are duos (2) or two solos (1+1); and solos are, well, solos (1). Quartets, on the other hand, can be reconfigured as six double-solos-plus-duos (1+1+2), four solo-plus-trios (1+3), three double-duets (2+2), one quadruple-solo (1+1+1+1), and one quartet (4).

some (unanswered) questions

Is there really something special about the quartet?
Do the qualities that I’ve attributed to the quartet ring true to you? Is that Goldilock’s response just lazy dogma on my part?

The straight man: how do quartets break down socially?
Has anyone else observed the phenomenon of the ‘straight man’ in a quartet? A individual who doesn’t hang-out in the same places, doesn’t share the same sense of humour, has distictive dietary requirements, tends to play ’bop licks more (or less) than the rest of the quartet?

Friday, January 19, 2007

playing in position pt. 8a: one string melodies (yet again)

Despite what I’ve said, we’re going to visit the one string melodies one last time before entering into a very brief discussions on physiology and posture.

Let’s deploy the extended hand shape into the one string line/melody (still Morricone’s music from Cinema Paradiso). If you’ve been following this thread and these tasks, you should have no difficulty with the following:melody played with fourth fingerThis is largely the same as the first example in ‘playing in position pt. 5: one string melodies (again)’, merely shifted into a diatonic context. Note that we’re variously alternating between ‘finger-per-fret’ and the ‘extended’ shapes depending on the underlying scale structure. As before, you can also play the line alternately with the first and the fourth finger:melody played alternately with fourth and first fingersThere’s actually a lot of information to assimilate here, so take your time with these, and we’ll continue in part 8b.

Saturday, January 13, 2007

2007: improvising guitar new year’s resolution

Well, it’s nice to finally be back here. I would have returned sooner except for having to finish off that ‘real’ writing task, and then having to fish for funding (I don't expect anyone became a musician because of their love of bureaucracy and red tape). Anyway, I’m much better now, so let me gently break into 2007 with not, I think you’ll be glad to hear, another list, but a proposed outline of what I’ll be writing about….

Okay, as far as pedagogical topics go, I’ll continue with the studies in playing in position (with, despite my reservations, an excursion into talking about posture), with the eventual goal of returning to natural harmonics (which was really the exciting stuff), and then clusters.
In addition, I want to open a thread on group improvisation. Specifically, I’ll start with a set of schemes for quartet. These schemes hover somewhere between exercises, training and tactics. Nothing particularly original or earth shattering, but I have found these schemes useful, and they bring up, for me, problems of conceiving interactions and issues of pedagogy.
On the flip side, I will continue to discuss (or at least try and find out how to discuss) solo improvisation. (I say “on the flip side”, but of course that’s a false dichotomy.)
Back on sociological ground, I want to tackle in more detail the idea that improvisation is ‘society-in-miniature’. Topics that I hope to address are utopias and the distinctions between the micro-social and the macro-social. I got into a bit of a twist in regards to ‘diplomacy’, and I hope Peter, sjz and others will continue to keep me on my toes, and prevent me from making broad generalizations.
I also want to flesh out the subject of the body. Recently, MLM, PE and myself, among others, have got ourselves into rhetorical funk trying to talk about bodies in the context of music and performance. It’s tricky to avoid that neo-Cartesian impulse (our language conspires to reinstate that distinction and that hierarchy), but bodies, as Butler might say, surely do matter.

I’m sure more stuff will present itself as the year ambles on (I hesitate to say ‘progresses’), but as a starting point, these suit me fine… for the moment (and that’s the important thing).

Monday, December 04, 2006

playing in position pt. 7b: learning the geography (again)

Let’s continue where we left off last time:descending major scale patternthree corresponding hand shapesAs we’ve already covered, when you play in position all fingers behind the stopping finger should be touching the strings. So, for instance, in the case of the first three notes of pattern A the resulting fingers on the ’board should be finger 1 (C#), fingers 1+2 (D), and fingers 1+2+3+4 (E).
In line with our last excursion in learning the geography, let’s repeat the patterns going down, but this time following the major mode’s (A major’s, in this case) arrangement of intervals.exercise, descending, treble E stringContinue the process across the strings:exercise, descending, B and G stringsIncidentally, note how the three patterns that we marked A, B and C (and the corresponding hand shapes) recur. There’s nothing particularly magical about this, it’s simply a side effect of how a major mode is constructed, but it does make your life a little easier.
Now ascending:exercise, ascending, bass E and A stringsTry different scales/patterns, and, as with the last time, once you’re comfortable with this, fire up the metronome, vary the rhythms, articulation and phrasing, add a little swing, etc. Be creative.

By the way, in addition to making reasonable warm-ups (but only in moderation and in combination with other tasks), these exercises are also an effective tools for getting acquainted with new or non-standard tunings.

Tuesday, November 28, 2006

playing in position pt. 7a: learning the geography (again)

Last time we took steps to learn the geography of the fingerboard, we were only using the ‘finger-per-fret’ shape. Let’s now go and try and apply the extended shape we learned last time to this task.

Within reason, you should be able to use whatever scalar pattern you want, but I’ll use the run-of-the-mill major mode here if only because its general familiarity. Most of the procedures covered in learning the geography last time are still applicable so I won’t rehearse them here. Needless to say you should be able to play the scalar pattern (major mode in this case) with the first finger with no problems.
One you do that, all that’s apparently left to do is add the other fingers (as before, the position of the first finger is marked my the diamond notehead):descending major scale patternThe corresponding hand shapes are as follows:three corresponding hand shapesThe first two hand shapes will be familiar by now, so shifting from A to B should be logical and straightforward. Shifting from B to C, on the other hand, requires you to shift, and think of, your first finger while simultaneously changing hand shapes. Keep in mind what I’ve said about this. Specifically:

…as you shift up [or down] the neck of the instrument, you’d be getting your bearings from the first finger, and be thinking in terms of two positions with two corresponding hand shapes….
I wouldn’t rush this—there’s a lot of information to be encoded and absorbed into your mind and body—so I’ll leave it there and continue in part 7b.

Thursday, November 23, 2006

playing in position pt. 6: more physiological compromises

If you’re relaxed and comfortable with the tasks covered in the last entry on position playing, you should be secure with the shape colloquially known as ‘finger-per-fret’. Although this hand shape is fine up to a point, if you tune your guitar intervals larger than major thirds, and that’s the case with all but one adjacent pair of strings in standard tuning, then the whole chromatic scale is not available in a single position. In order to cover the chromatic scale, we need four fingers to span five fret positions.finger-per-fret and extended shapesAbove, left is the shape we’ve covered so far, as above, right is the extended shape (I’ve heard this referred to as ‘extended-finger-per-fret’ which sounds to me like a klugy designation at best). From now on, the bulk of our position playing will be shared between these two hand shapes; shifting from one shape to the other.

A question you may be asking is, conceptually, do you (a) shift the first finger while keeping the rest of your hand stationary, or do you (b) shift your hand while keeping your first finger stationary. Since you’d be only moving one finger (a) seems to be more efficient, on the other hand, given that you should be getting your bearing from your first finger, (b) seems more in line with the reasons for playing in position. The image below shows the ‘finger-per-fret’ shape in the center, with movements (a) and (b) represented on the left and right respectively:shifting first finger and shifting hand except first fingerThe simple answer to this query is both (a) and (b); the more complex answer is neither (a) nor (b).
Simple answer first: When shifting up or down the neck, you still get your bearings from your first finger, thus, in such situations, (b) describes better the mental processes involved. However, once you have shifted into position, (a) describes better the processes involved since the first finger may occupy two fret positions. Let’s illustrate this with two ways to approach a scale fragment:scale fragment played in single and two positionsThe first of these, you’d be thinking in terms of a single position in which the first finger occupies two fret positions—thus (a). In the second example, as you shift up the neck of the instrument, you’d be getting your bearings from the first finger, and be thinking in terms of two positions with two corresponding hand shapes—thus (b).
Now the more complex answer: Eventually, you should not be thinking about macroscopic gestures (the position and movement of the first finger/arm/etc), and the microscopic gestures (the shape and orientation of your finger/hand/etc) as separate phenomena with corresponding independent mental processes. This should come with study, time and practice.

Incidentally, some of you may know of a technique in which the fourth finger occupies two fret positions (in which case a single position spans six fret positions). I am not going to cover that here primarily because I don’t use this fourth finger extension at all frequently, and thus I feel unqualified to talk about it.

Tuesday, November 21, 2006

playing in position pt. 5: one string melodies (again)

Having taken our first steps in integrating the small-scale and large-scale gestures in position playing, let’s revisit those one string lines, but, this time, instead of playing the line with the first finger, this time play it with the fourth. Again, this could be any scale, arpeggio, or melody, but, as the example, I’m still taking Morricone’s music from Cinema Paradiso:melody played with fourth fingerThe first finger’s position is marked by the diamond notehead, and, in tablature, with the number in square brackets.
What we’re doing here is shifting the ‘finger-per-fret’ shape up and down the neck. As you shift this shape, you should be thinking of the position of the first finger (and only thinking of the fourth finger in terms of the ‘finger-per-fret’ shape relative to the first). Remember, in position playing the guitar player gets their bearing from their first finger. The fact that the note three frets above the first finger is the one that you hear should not be your primary concern, just target the appropriate fret with the first finger and the rest should fall into place.
As always, try different strings, and different lines/melodies.

If you’re having difficulty keeping in mind the position of the first finger, try a variant like the following:ornamented with alternating fourth and first fingersExercises like the one above allows you to sound the fret at the first finger to aurally remind you where you are.
Once you’re comfortable with these, try, for example, playing the line alternately with the first and the fourth finger:melody played alternately with fourth and first fingersBy alternating sounding the first and the fourth finger in such cases, we’re psychologically and physically constructing a non-linear relationship between sounding/fretting actions (and the corresponding aural feedback) and macroscopic gestures.

Incidentally, I hope I don’t need to, at this stage, remind you to relax and take your time….

Friday, November 17, 2006

playing in position pt. 4: what about finger independence?

You may be wondering why, in these discussions of position playing, that I’m not talking about finger independence. If you’re used to those rigorous and exhaustive compendiums of fingerboard calisthenics (or s&m exercises), you may be asking what the reason for the relative simplicity of these exercises is.
Finger-to-finger independence is one of those things that you come across in keyboard pedagogy (and even there it is not quite as useful as sometimes made out). One of the things that differentiates the keyboard from the fretboard (excepting instruments such as the clavichord and the Ztar) is that the former has random access (you can, more or less, press any combination of keys) while the latter, in comparison, has significant restrictions in degrees of freedom (only one note per string). While the former is conceptually a set of non-latching pushbuttons, the latter is a set of single-pole, multi-throw switches (in the case of the guitar, this would be something like six SP20T switches). Nothing wrong with that, but it does mean that very, very little of a guitar player’s repertoire of gestures requires, or draws upon, the finger-to-finger independence of movement.
Generalizing for a moment, I would not recommend that any budding guitar player work specifically on finger independence unless their particular technique demands it (e.g. touch/tap playing or contrapuntal fingerstyle). Furthermore, unless you know what you are doing, unless you are mindful of your physical/physiological parameters and constraints, it may be best to take your time and approach this at a later date, and with caution. It does not help that many of the published collections of exercises range from useful, if approached properly, to pointless, and possible sources of injury.
My two cents….

updates:

11–18–06: Correct the conceptual guitar fretboard switch from a 6P20T to six SP20Ts.

Wednesday, November 15, 2006

playing in position pt. 3: learning the geography

Seems like a long time since my last entry on position playing, and even longer on natural harmonics. So, let me get back to these…

These are the simplest exercises. They’re not, well, even really exercises. These make passable warm ups, but, you know, there are much better stuff you can do for that purpose. Think of these as stepping stones towards playing (and thinking) in position.
If you’ve managed the tasks on playing in position pt. 1: don’t get lost, you should have no problem playing, with the first finger on the fretboard, a chromatic scale (or any other set of intervals for that matter). Find a comfortable point on the guitar (say, around the neck’s mid point), and, just stopping using your first finger, play a descending chromatic scale on the treble E string:chromatic scale, descending, treble E stringNow lets add the other fingers.exercise, descending, treble E stringThe position of the first finger is marked in each case with a diamond notehead. Your first finger should remain at this position while fingers two, three and four land on the fingerboard for the upper notes. Relax, don’t use excessive force: you don’t actually need to press down the string with anything other than your fourth finger, but the other fingers should nevertheless rest approximately at the fret positions. The result should be that archetypal ‘finger-per-fret’ shape.
This is important: The point of these exercises is to get you used to feeling your location on the fingerboard with that first finger while simultaneously getting comfortable with the distribution of fingers down the frets (the finger-per-fret shape). I reiterate, you should not have to press down hard with all fingers, but at least rest the non-fretting fingers (second and third) gently on the string as the fourth finger comes down.
Stop when it starts to become uncomfortable. As you play these, it is entirely reasonable for you not to go all the way down the neck of the instrument. As you repeat the shape towards the bass end of the instrument’s neck, as the adjacent frets become more distant, you may find that your fingers, hand, arm, etc. become less comfortable. Stop and take a break.
You got the idea? You can now do the same on this on the other strings.exercise, descending, B and G stringsAnd ascending:exercise, ascending, bass E stringOnce you get this under your belt, try using a metronome, vary the rhythms, articulation and phrasing, add a little swing, etc. Be creative.
Remember, these are transitory exercises, once onto the next step, you’ll probably never play these again (maybe except to demonstrate to your own students), so don’t dwell on, or over play, these.

updates:

11–18–06: Correct a few errors in the notation of the exercises.

Friday, November 03, 2006

playing in position pt. 2: physiological compromises

Because “everyone’s bodies are different, and guitars vary in shape and size,” I’ve expressed skepticism that playing in position was a “more efficient or comfortable playing technique.” Let me elaborate on that (not at all straightforward) relationship between position playing and physical comfort here. Also, keep the following discussion in mind for when we return to looking at natural harmonics.

My usual disclaimer. Specifically:

I have no knowledge of your physiology, your particular instrument, or your posture. Please, please, please, note that the following may not be applicable to your situation, and, at best, should be adapted to fit your your needs. Be careful and listen to your body: If it hurts, or it’s uncomfortable, stop and review.
However, in very general terms, in approaching this material, your whole fingerboard-side arm should have mobility. If your elbow cannot swing around comfortably, you’re probably not doing this right. A common mistake is to make these fingerboard shapes while attempting to keep your forearm frozen, resulting in having to twist and contort your hand/fingers.

The orthodox shape of the fingerboard hand at rest is colloquially described as ‘finger-per-fret.’ The shape corresponds roughly to that of a hand holding a pencil.pencil in hand(Incidentally, note that the thumb is not opposite the first finger. Contrary to some accounts of how the guitar’s neck should be held, you may find it is uncomfortable if the thumb directly opposite the first finger.)
That should be reasonably comfortable, but unlike a pencil, the guitar strings are not as freely rotated or repositioned.in-line positionThe orientation and location of the fingerboard hand will depend on multiple factors. Even at best, the result is to some extent a compromise: Trading off the comfort of your fingerboard hand and arm against your picking hand/arm, your back, legs, etc. Before you go and radically rethink your posture, it’ll be instructive to think what might be the most comfortable fingerboard shape.relaxed and diagonal shapesIn practice, the most comfortable position for the fingerboard hand will likely resemble something like the shape above, left. Or, clearing-up and abstracting a general shape, something like the above, right. This is a diagonal fretting pattern that, from first to fourth finger, moves bass to treble across the strings, and bass to treble up the frets.
Even if you’ve never explicitly encountered this oblique fingerboard pattern, it lies at the root of both the ‘chord’ (perpendicular to the strings) and ‘finger-per-fret’ (in-line with the strings) shapes.perpendicular and in-line positionsThe shape that is perpendicular to the strings (above, left) is under theorized, but will be familiar if you think about the fingering of chords. (The algorithm for finding the fingering pattern for chords is, from first to fourth finger, (a) move bass to treble up the frets unless you need to stop two or more string on a given fret, in which case (b) bass to treble across the strings. Does this resemble anything we’ve already covered?)
If we consider the diagonal fingerboard shape as the rest position, we can consider these others as extremities. From the diagonal shape, we can rotate the fingerboard arm about the first finger to achieve, in one direction, the in-line shape, and, in the other, the perpendicular shape.
If we understand these as the extremities, we can also understand why the reversed diagonal shape (below), for example, is, depending on your posture, difficult (please do not over do this one):reverse diagonal shapeOkay, why all this information? Understanding what shapes are more comfortable and what is less, helps us understand why certain patters are easier to play than others. Specifically, when we return to natural harmonics, when we start discussing clusters, or two handed touch/tapping, we’ll come back to these ideas. In effect, becoming aware of the physiological-physical interface and its pressures and compromises, we are taking our first baby steps towards becoming consciously engaged in the cyborg relationship between humyn (guitarist) and artifact (guitar).

updates:

11–19–06: Fix orientation of the images (they were accidentally mirrored).

Saturday, October 28, 2006

playing in position pt. 1: don’t get lost

Still on hiatus from natural harmonics, and having proposed that the purpose of playing in position is not to get lost, let’s look at how this works in practice.

An element often neglected in those fingerboard diagrams is any indication of each finger’s function in position playing; in particular, the function of the first finger. The first finger is responsible for your bearings.
Let me say that with some emphasis:

In position playing the guitar player gets their bearing from their first finger.

Looking at piano, as a contrasting example, the pianist gets their bearing from the position of their thumbs. Thus, the pianist will shift their hand, aim to land their thumb on the appropriate key, and, while moving into position, the hand shape will be altered depending on the line/chord shape. A similar principle applies to the guitar and guitarist, except the player gets their bearings from their first finger.
One of the simplest ways to practice this is to play a line on a single string. You can do scales, arpeggios, or, my preferred pedagogical atom, a melody. Take something you’re familiar with; something with a mixture of intervals. Something like Somewhere Over the Rainbow or Morricone’s music from Cinema Paradiso:
first phrase of Cinema ParadisoRelax. Find a comfortable posture. Move your fingerboard hand into position. Choose, arbitrarily, one string. Stop the string only using the first finger and play.
Try and feel the movement of your body as you do this. Mentally note how each interval leap, each part of the fingerboard, feels different in your arm, shoulder, in your body. (If you’ve ever had problems playing with your eyes shut, this may be the time to try closing them again.)
Experiment with the motion of your arm. Try smooth motions, abrupt shifts; try slides, glissandi or play the notes staccato.
Cinema Paradiso with phrasing and articulationTry different phrasing; try different strings; try different melodies.
Try improvising on one string with the first finger stopping the string.
Have fun (but don’t over do these).

Attention: I have no knowledge of your physiology, your particular instrument, or your posture. Please, please, please, note that the following may not be applicable to your situations, and, at best, should be adapted to fit your your needs. Be careful and listen to your body: If it hurts, or it’s uncomfortable, stop and review.
Although I cannot give explicit advice about movement without making assumptions about your posture, and, consequently, your instrument and your body, keep in mind that position playing is “a framework for linking together small and large gestures”, and thus what we are practicing here is the macroscopic gestures. Generally speaking (and always adapt this advice based on your real-world posture, etc) the first finger’s movement should be macroscopic. Do not be afraid of broad, sweeping gestures. The movement should not come from the twist of your wrist. Try moving your arm, swing your elbow, work your shoulders, etc. You may feel your back, buttocks, legs affected by, or contributing, to this movement.
If your movement is hampered (e.g. your elbow is locked into your ribs), you may seriously want to consider reexamining your posture.

Friday, October 20, 2006

playing in position pt. 0, reasons for

Taking a break from looking at natural harmonics, let’s take a detour into fingerboard positions.

Playing in position is one of those staples of orthodox guitar technique (and the technique of many other string instruments). We all kinda have some notion what it is, but why do it? Candidate answers might include: (a) It facilitates faster playing, (b) it’s a more efficient or comfortable playing technique, or (c) once you memorize the positions, playing becomes easier.
There’s enough high-velocity players with extremely, let’s say, idiosyncratic techniques to throw serious doubt on (a). Given that everyone’s bodies are different, and guitars vary in shape and size, I’m always slightly suspicious of any claims of universal efficiency or comfort implied by (b).
As far as (c) goes, from a pedagogy standpoint, it is a popular answer. There’s a large amount of guitar tutor books and manuals that carry fingerboard diagrams of scales and arpeggios to be committed to memory. I’m skeptical. How many people can really be troubled to memorize every permutation of scales and arpeggios in a given position? And this approach may be fine when you’re dealing with a small number of patters (say, eight or nine permutations each of one major and one minor mode), but does it scale up? How many players find this ‘memorize and execute’ method useful? (That’s not a rhetorical question: I'm genuinely interested.)
I’m going to propose a slightly different reason for playing in position. To play in position is to prevent the guitarist (and their fingerboard hand) from getting lost. Position playing is a way of getting bearings, a method for practicing fingerboard gestures, and a framework for linking together small and large gestures. (BTW, I’m not claiming any universal utility, and I hope I’m not making a totalizing statement, but this does work for me, and I hope it will helpful in when we return to the topic of harmonics.)